5 Best Google Sandbox and Penalty Checker Tool in 2024

5 Best Google Sandbox and Penalty Checker Tool in 2024

Google Sandbox and Penalty Checker Tool to Use (2024)
Google sandbox and penalty checker tool can help you to find why your website is not ranking in Google. Google penalty checker tool helps you to find out whether your website got a penalty from Google or not so that you can take steps accordingly to improve the condition of your site. Sometimes getting penalized by Google deindexes all your pages from Google.

Google sandbox checker tool helps you to find whether Google put your website in sandbox or not. The sandbox is a term described by SEO experts to explain the situation where Google refuses to rank new websites and conducts some research before ranking them. Sandbox can also happen if Google penalizes you website and hence Google stops ranking your website or even showing your website in the search results. 
Now, if you want to check what the possible reason is that your website is not ranking in Google even though it has quality content, this Google sandbox and penalty checker tool can help you reason for that. In this article I have listed some Google sandbox and penalty checker tools you can use in 2024 also explained how to use them.

Top Google Sandbox and Penalty Checker Tools

These are the tools that can help you find Google sandbox and penalties,

1. Google Search Console

Google Search Console is a free set of tools for webmasters provided by Google. So how to use Google Search Console to find sandbox and penalties? You can do that just following two steps,

1. Check for manual actions and security issues

Google Sandbox and Penalty Checker Tool to Use (2024)
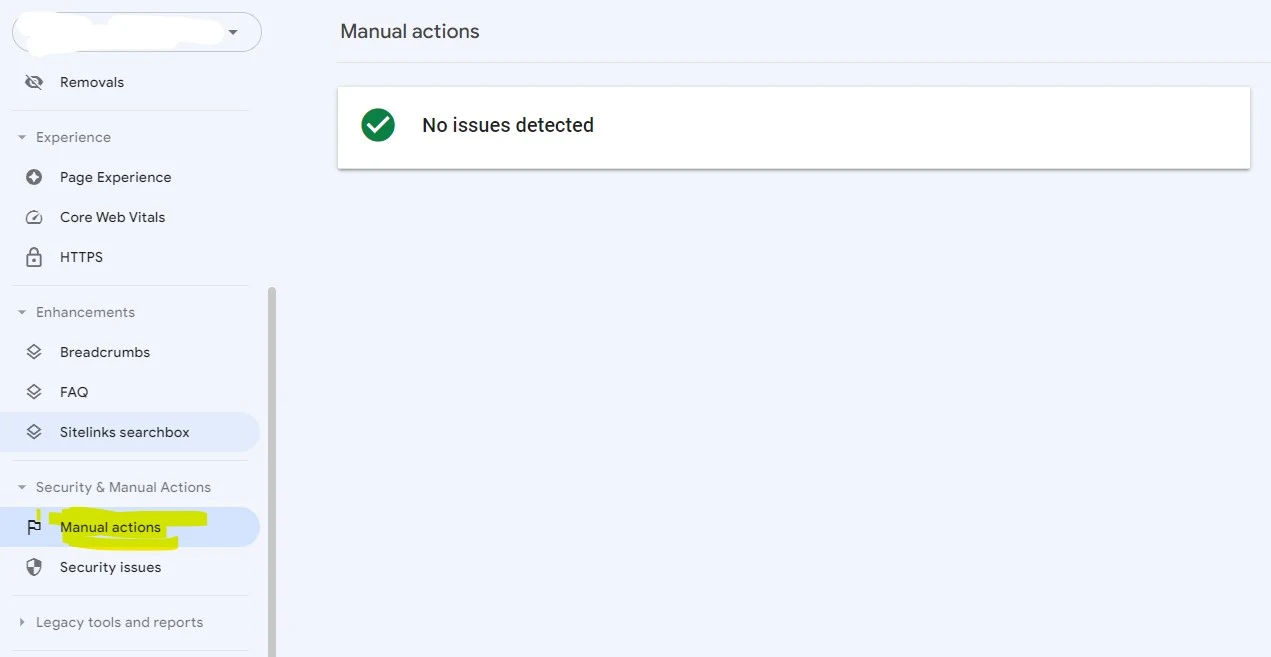
Like stated in the above image from menu section of Google search console go to "Security  & Manual Actions" then click on manual actions to check if Google penalized your site and put your site in sandbox or not.
Google Sandbox and Penalty Checker Tool to Use (2024)
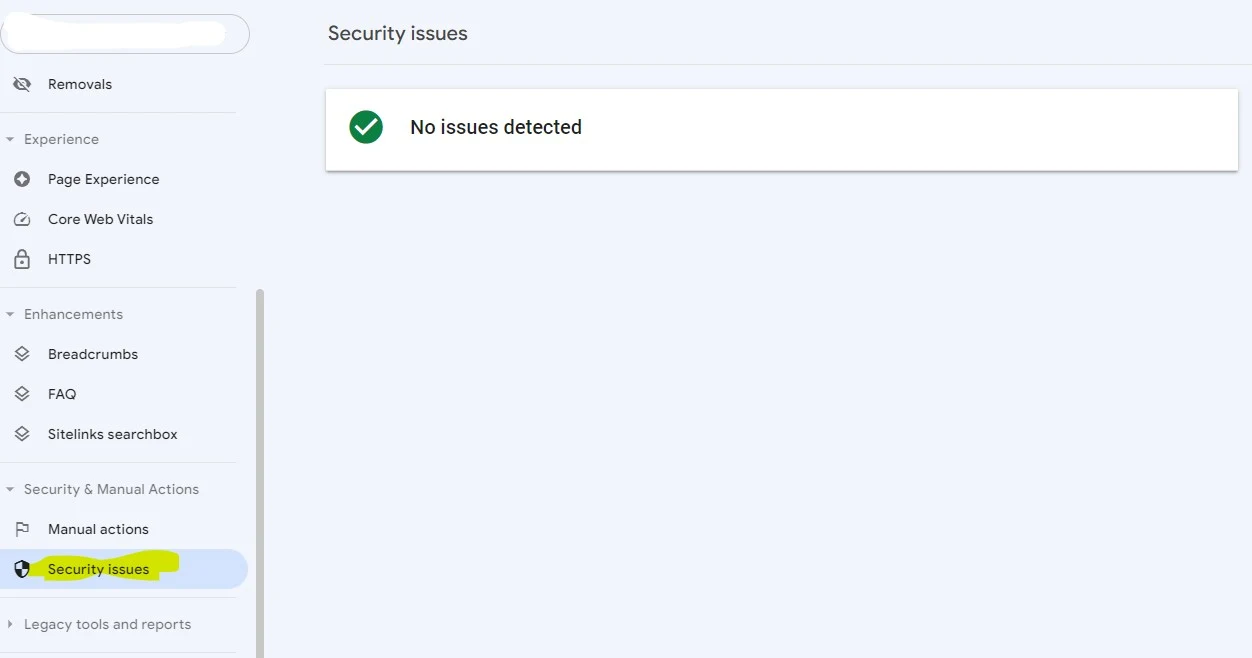
Now again go to "Security Issues" from "Security  & Manual Actions" and find if there is any security issues found. 
Fixing this manual actions and security issues will fix penalties of your site and will remove your site from Google sandbox. 

2. Check Performance Issues

Google Sandbox and Penalty Checker Tool to Use (2024)

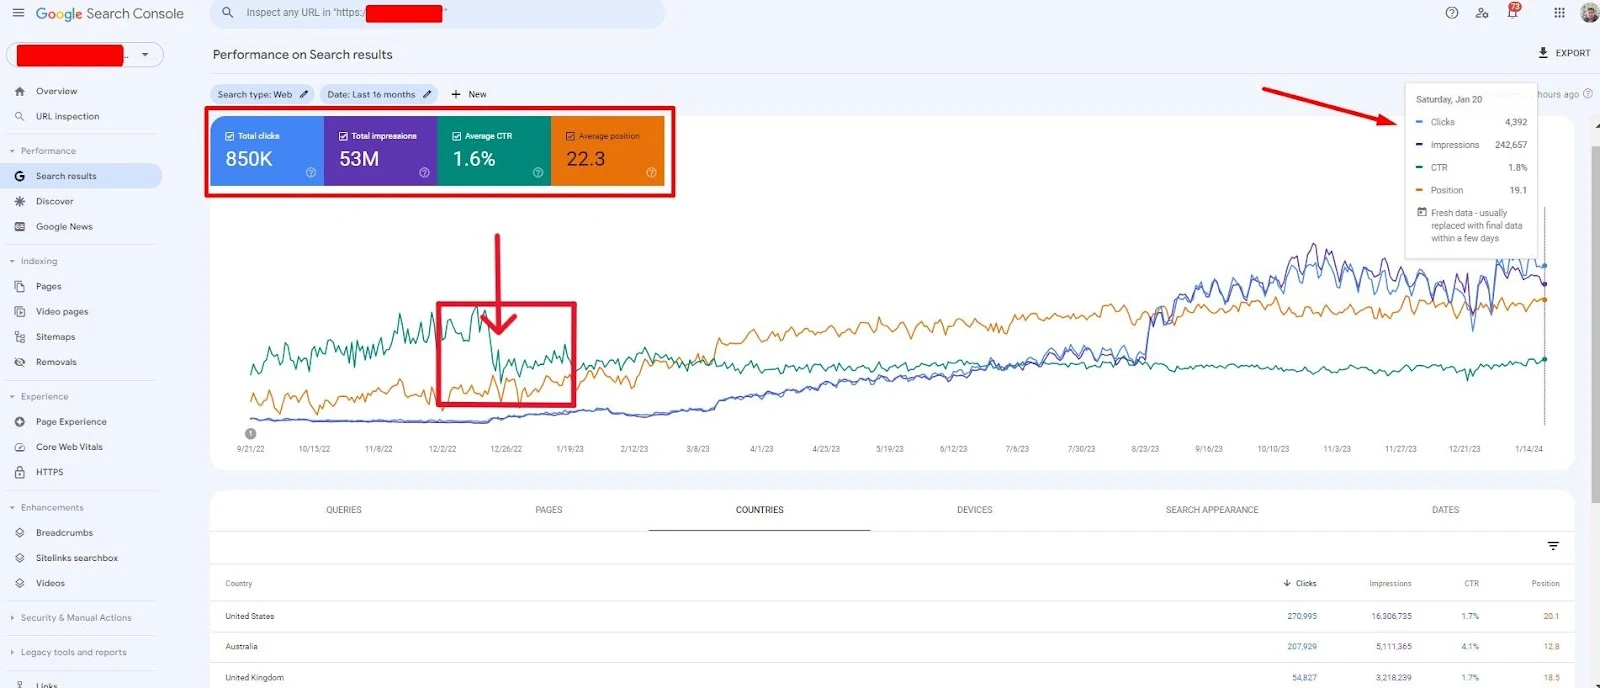
If you find any sudden drop in impressions and clicks in the performance tab, there is a high possibility that Google penalized your website and it is now in the sandbox. However, with continuous posting of high-quality content, you can earn Google's trust back.

2. Moz Google Algorithm Change History

Google Sandbox and Penalty Checker Tool to Use (2024)
Moz Google Algorithm Change History helps you to find all the Google algorithm core updates and their released dates. If you find sudden drop in impressions and clicks during the period of an core update that's because Google penalized your site and there is no doubt in that. 

Thus you can find if your site was penalized by Google from this tool. You can also find update related information and what's changed during this core update period from this tool.

3. Semrush Sensor

Google Sandbox and Penalty Checker Tool to Use (2024)
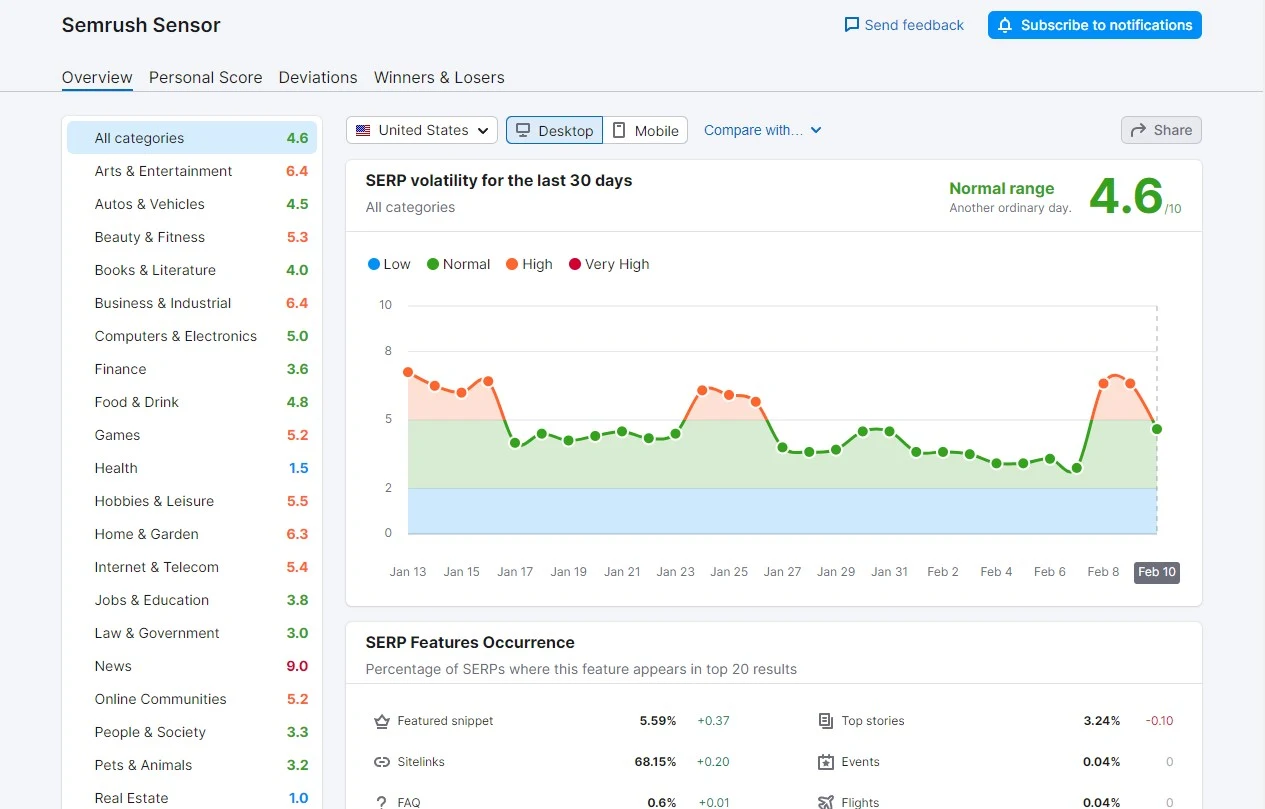
Semrush Sensor is a tool that indirectly helps you to check Google Sandbox and penalty. Semrush Sensor works by showing the search volatilities of different website niches. This tool shows which niches were more prioritized by Google and received more traffics than usual.

This tool also helps to find which websites were the winners and which were the looser under specific niche.

4. Paguin Tool

Google Sandbox and Penalty Checker Tool to Use (2024)
Panguin tool helps you to check Google Sandbox and penalty, all you need to do is sign in with Google Analytics account which connected to your website. Then you'll be able to see your traffic data during Google update period and also can find out if your website is penalized or not by traffic fluctuation data.

5. Fruition Penalty Checker

Google Sandbox and Penalty Checker Tool to Use (2024)
Fruition's penalty checker tool works by using a statistical analysis and provides a clear understanding into which Google updates have the most significant impact on your website. Then, suggests you what you should do next to recover from the penalty helping you remove your website from Google Sandbox.

Tips for Avoiding Google Sandbox and Penalty

To avoid your site being penalized or moved to Sandbox by Google follow this tips,
  • Avoid black hat SEO techniques.
  • Avoid unnatural link buildings.
  • Avoid buying links.
  • Avoid creating spammy contents.
  • Start writing helpful contents for your users.
  • Avoid copying contents from other websites.
  • Monitor backlinks regularly and disavow any toxic or spammy links that could harm your website.
  • Regularly update your website with fresh and relevant content.
  • Avoid keyword stuffing.
How to Find Blogger RSS Feed URL - Easily (Blogspot)

How to Find Blogger RSS Feed URL - Easily (Blogspot)

How to Find Blogger RSS Feed URL - Easily (Blogspot)
RSS feed URL is a web location or a link which enables blog readers to subscribe to any blog they want to read. It allows readers to stay updated with the latest posts or articles of any blog they might want to read.

RSS feed URL contains XML data that includes titles, summaries, and links to the full posts. So whenever, the reader wants to read the full post by reading a glimpse of the post through summary they can easily read the whole post. Users can use various RSS feed readers like Follow.it, FeedBurner to subscribe to these feeds and receive notifications whenever a new content is published.

How to Find Blogger RSS Feed URL

To Blogger RSS feed URL can be little bit tricky. Finding RSS feed URL from WordPress site is pretty easy as there are quite a lot of plugins to do so. But I will show you how you can easily find RSS feed URL of your Blogger site. There are two way to find Blogger RSS feed URL. I will show you both of them.

Method 1: From Page Source

With this method you can directly find your Blogger site's RSS feed URL. Though, you need a computer for this, this method won't work on mobile devices. So follow these steps,

Step 1: Visit you site

Now open Google Chrome and enter your site URL and open your site.

Step 2: Right Click

Now, make a right click on you mouse while your site is open on the tab.

Step 3: View Page Source

Click on view page source from the menu appears upon right click. This will open the page source tab.

Step 4: Find Feed

From page source tab, click Ctrl+F on keyboard, this will help you to find your RSS feed URL link, so when the search tab open type "feed" in the search tab and click Enter. you'll find total 3 feed URLs, all of them can be used as a feed. Though only of them is RSS feed the others are atom feed URL, the one contains ?alt=rss attribute is the URL of RSS feed.


Method 2: From Your Domain

This method is indirect and the easiest. You can easily find RSS feed URL of any Blogger website with this method. You can use any device to find you Blogger site's RSS feed URL with this method. Follow the below steps,

Step 1: Find Your Domain URL

Find your domain URL, for example we are assuming your domain URL is https://example.com/.

Step 2: Add feeds/posts/default?alt=rss

Add "feeds/posts/default?alt=rss" after your domain URL ends. for example if your domain URL is https://example.com/ your RSS feed URL will be https://example.com/feeds/posts/default?alt=rss.
And your atom feed URL will be https://example.com/feeds/posts/default.

Redis Message Queue - Implementation - Commands

Redis Message Queue - Implementation - Commands

Redis Message Queue - Implementation - Commands
In this blog post, I will discuss the Redis Message Queue, Stream type of Redis. Redis has introduced a new data type called Stream type since 5.0, which is specially designed for message queues. There are many more message queues such as RabbitMQ, Kafka but here we will just discuss how to implement Redis as a message queue.

In a distributed system, when two components want to communicate based on a message queue, one component sends a message to the message queue, which we call a producer, and the other component consumes the message, and then processes it, which we call a consumer. As shown below:

The message queue is especially to clear up the trouble of processing inconsistent competencies among producers and consumers. It is often an indispensable middleware in large factories. Redis had a message queue function based on publisher and subscriber (pub/sub) before 5.0.

Redis has a disadvantage that when there is a Redis downtime, network disconnection, etc., messages get discarded. However, Redis Stream provides message persistence and master-slave replication functions, allowing any client to access the data at any time, and remember the location of each client’s access, and ensure that the message is not lost.

Redis Message Queue Commands

1. XADD

ADD infotipsnews * 1 hello
XADD is used to insert a message into the message queue(In the Current Example message queue name is infotipsnews). The key of the message is the 1 and the value is “hello”. The “*” after infotipsnews auto-generate globally unique ID. 

It is automatically generated for the inserted message, 1631288930852-0, the first half of 1631288930852 indicates the UNIX time in milliseconds of the server, and the second half of 0 is a message sequence number in order to distinguish messages which are delivered at the same time.

2. XTRIM

XTRIM infotipsnews maxlen 100
It is used to remove older entries from the message queue based on parameters such as MAXLEN or MINID. When the Stream reaches the maximum length, the old messages will be deleted. In the above example, if the stream reaches a maximum length of 5 then it will delete the old message. 

Due to the internal implementation mechanism of the stream, and accurate setting of an upper limit of length will consume more resources, so we generally adopt a fuzzy setting method: XTRIM infotipsnews maxlen ~ 5 , which means that the length can exceed 5, which can be 6, 9, etc., It is up to redis to determine when to truncate.

3. XLEN

It returns the number of entries inside the stream. In the above example, XLEN returns the length of the message queue i.e. infotipsnews.

4. XDEL

It is used to remove specific entries from the message queue. In the above example, the command Indicates to delete the message with ID 1631288930852-0 in the message queue infotipsnews.

5. XRANGE

XRANGE infotipsnews - +
It is used to read the message. “$” represents the latest message, and “block 10000” is blocking time in milliseconds i.e. 10s. In the above example, XREAD is reading a message, if no message arrives, XREAD will block for 10s and then return NIL. If a message arrives within 10s then the message is returned.

6. XREAD

XREAD block 10000 streams infotipsnews $
It is used to read the message. “$” represents the latest message, and “block 10000” is blocking time in milliseconds i.e. 10s. In the above example, XREAD is reading a message, if no message arrives, XREAD will block for 10s and then return NIL. If a message arrives within 10s then the message is returned.

7. XGROUP

XGROUP CREATE infotipsnews mygroup 0
XGROUP is used when you want to create New Consumer, Destroy a Consumer Group, Delete Specific Consumer etc. In the above example, I have created a consumer group mygroup for the message queue infotipsnews, 0 means to read from the very beginning position. 

In Order to Destroy the Consumer execute XGROUP DESTROY infotipsnews consumers.

8. XREADGROUP

XREADGROUP group mygroup consumer1 streams infotipsnews >
XREADGROUP is a special version of XREAD with the support of consumer groups. In the above example, consumer1 in the consumer group mygroup reads all messages from the message queue infotipsnews, where “>” means to start reading from the first unconsumed message. 

It should be noted that once the message in the message queue is consumed by a consumer in the consumer group, it can no longer be read by other consumers in the consumer group. The purpose of using consumer groups is to allow multiple consumers in the group to share and read messages. 

Therefore, we usually let each consumer read part of the message so that the message read load is evenly distributed among multiple consumers.

9. XPENDING

XPENDING infotipsnews mygroup
In order to ensure that consumers can still obtain unprocessed messages after a failure and restart, Streams will automatically use an internal queue to store the messages read by each consumer in the consumer group until the consumer uses the XACK command to notify Streams, The message has been processed. When the consumer restarts, you can use the XPENDING command to view the messages that have been read but have not been confirmed.

10. XACK

XACK infotipsnews mygroup 1631289246997-0
It means that the consumer group mygroup has confirmed that it has processed the message with id 1631289246997-0 in the test message queue.

So far, we have understood the usage of using the Stream type to implement message queues.

Why do we use Redis as a message queue

To use message queues, you should use special message queue middleware such as Kafka and RabbitMQ, and Redis is more suitable for caching. In fact, I think that the technology used is related to the application scenario you are currently encountering. 

If your message communication is not large and you are not sensitive to data loss, then using Redis as a message queue is a good way. After all, Redis is compared to Kafka. For professional messaging systems, it is more lightweight and has low maintenance costs.

Docker Compose file vs Dockerfile - Differences - Explained

Docker Compose file vs Dockerfile - Differences - Explained

Docker Compose file vs Dockerfile - Differences - Explained
The Dockerfile is used to build a custom image and does not directly generate a container. It’s just that you can run the container while running the image.
The container orchestration to deploy the environment is done using the docker-compose.yml file, which may require a Dockerfile.

Dockerfile is used to build a mirror. If you want to use this mirror, you need to use the docker run command to run the mirror to generate and run a container.

If you have multiple containers and each container is dependent on another container then with docker-compose we can link.

Dockerfile

Write each layer of modification, installation, construction, and operation commands into a script. Use this script to build and customize the image. This script is the Dockerfile.

Dockerfile part of the instructions:

// FROM Specify the base image
FROM nginx

// Excuting an order. Each RUN will generate a layer, and use && as much as possible for a requirement, so as to reduce the RUN, that is, reduce the layering 

RUN echo '<h1>Hello, Docker!</h1>' > /usr/share/nginx/html/index.html
RUN yum update && yum install -y vim python-dev

// COPY: Copy package.json in the source path to the mirror path /usr/src/app on the new layer
COPY package.json /usr/src/app/

// WORKDIR Specify the working directory. Specify the lower-level working directory as /data in the container, try to use an absolute directory
WORKDIR /data

//ADD can automatically decompress files. The following example finally hello under /data/test
ADD hello test/ 

// Copy is similar to ADD, except that files cannot be decompressed
COPY hello test/

// CMD Excuting an order
CMD ["node", "index.js"]

// ENV Set environment variables and define NAME=Happy Feet, then you can use $NAME to execute

ENV VERSION=1.0 DEBUG=on NAME="Happy Feet" // VOLUMES mount


// EXPOSE Port exposure

EXPOSE <Port 1> [<Port 2>...]

Dockerfile example


// 1、创建 Dockerfile
mkdir mynginx
cd mynginx
vim Dockerfile

// 2、输入以下内容并保存:
FROM nginx
RUN echo '<h1>Hello, Docker!</h1>' > /usr/share/nginx/html/index.html

// 在 Dockerfile 目录下执行,生成新的自定义 images
docker build -t nginx:v3 .

Docker-compose

docker-compose is an official open source project, responsible for the rapid orchestration of Docker container clusters and the deployment of distributed applications. Define a group of related application containers as a project through a single docker-compose.yml template file (YAML format)

Install docker-compose

It has been installed by default under Mac and Window. However, it must be installed manually under Linux. The binary package is used here

sudo curl -L https://github.com/docker/compose/releases/download/1.26.0/docker-compose-`uname -s`-`uname -m` > /usr/local/bin/docker-compose
sudo chmod +x /usr/local/bin/docker-compose

// Test docker-compose
$ docker-compose --version

General steps

1. Create an empty directory.
2. Define Dockerfile to facilitate migration to any place
3. Write docker-compose.yml file
4. Run docker-compose up to start the service

Examples of using docker-compose

Next, we use Node JS to build a website that can record the number of page visits.
1. Create an empty directory: mkdir -p /data/test
2. Create index.js under the empty file and enter the following. In createClient() you can apply a hostname that you have mentioned in docker-compose.yml

const express = require('express');
const app = express();
const redis  = require('redis');
app.get('/count',async function (req,res){
    const client = redis.createClient({host: 'redis-server'});
    return client.get('visit',(err, count)=>{
        count=Number(count)+2;
        return client.set(['visit',String(count)],function(err){
        return res.status(200).send(`Total Visit ${count}`);
        })
    });
})
app.get('/ping',(req,res)=>res.send("OK"));
app.listen(3001);
3. Write the Dockerfile file:

FROM node:14
ADD . /code
WORKDIR /code
RUN npm install express redis
COPY . ./code
CMD ["node", "index.js"]
4. Write the docker-compose.yml file

version: '3'
services: 
  redis-server:
    image: 'redis'
  web: 
    build: "."
    ports: 
       - "5001:3001"
    depends_on:
      - redis-server     
    links:
      - redis-server   
5. Execute the docker-compose project

docker-compose up

Description of yml template file:


version: '3'
services:
    phpfpm:
    image: yoogr/phpfpm:0.0.1
    container_name: ct-phpfpm
    build:
      context: .
      dockerfile: Dockerfile
    expose:
      - "9000"
    volumes:
      - ${DIR_WWW}:${DIR_WWW}:rw
      - ./conf/php/php.ini:/usr/local/etc/php/php.ini:ro
      - ./conf/php/php-fpm.d/www.conf:/usr/local/etc/php-fpm.d/www.conf:rw
      - ./conf/supervisor/conf.d:/etc/supervisor/conf.d/:ro
      - ./log/php-fpm/:/var/log/php-fpm/:rw
      - ./log/supervisor/:/var/log/supervisor/:rw
    command: supervisord -n
    links:
      - mysql:mysql
      - redis:redis
Each service represents a container. The container can be created through the image of dockerhub, or it can be created from the image built from the local Dockerfile. If a service needs to use the image built by Dockerfile, specify the text location and file name of the build-in docker-compose. The yml file can specify volume and network. 

The following is an example of using network and volumes parameters (placed in the same layer relationship with service):

version: '3.0'
services:

  wordpress:
    image: wordpress
    ports:
      - 8080:80
    environment:
      WORDPRESS_DB_HOST: db
      WORDPRESS_DB_PASSWORD: examplepass
    network:
      - my-bridge

  db:
    image: mysql:5.7
    environment:
      MYSQL_DATABASE: wordpress
      MYSQL_ROOT_PASSWORD: 123456
    volumes:
      - mysql-data:/var/lib/mysql
    networks:
      - my-bridge

volumes:
  my-data

networks:
  my-bridge:
    driver:bridge
The definition of network and volume is similar to docker network create and docker volume create. If you do not specify the connection network, then link will be used. 

Hope You like our “Docker Compose file vs Dockerfile” post. Please subscribe to our blog for getting updates on email for the upcoming blogs.
Node Js Router (With Express.js) - Explained

Node Js Router (With Express.js) - Explained

Node Js Router (With Express.js) - Explained
Node Js Router module is used to create endpoints for applications for handling client requests. A route is a chunk of Express code that links an HTTP verb (GET, POST, PUT, DELETE, etc.) to a URL path/pattern and a function that handles that pattern.

Routes may be created in a variety of ways. We’ll be using the npm module express in this lesson. Router middleware is useful since it allows us to aggregate route handlers for a certain section of a website and accesses them using a single route prefix. We’ll store all of our library-related routes in a “catalogue” module, and we’ll maintain them separated if we add routes for managing user accounts or other tasks.

Node Js Router module

In a module called Login.js, we first construct Login routes. The code imports the Express application object uses it to acquire a Router object, and then uses the get() function to add a handful of routes to it. Finally, the Router object is exported by the module.


var express = require('express');
var router = express.Router();

// Login page.
router.get('/', function (req, res) {
  res.send('Login page');
})

// Register Page 
router.get('/about', function (req, res) {
  res.send('You can view Dashboard');
})

module.exports = router;
We call an instance of express.router(). we use those routes to view the Login page as well as Dashboard. we can access the Login page at https://localhost:3001/ and Dashboard at https://localhost:3001/about,


var Login = require('./Login.js');
// ...
app.use('/Login', Login);
In order to utilize the router module in our main app code, we must first require() it (Login.js). The Router is then added to the middleware processing path by using use() on the Express application with a URL path of ‘Login’.

Now we set a middleware as Login.js. Now our URL has been changed https://localhost:3001/Login/ and https://localhost:3001/Login/about.

We can create such routes more and then apply them to our application, this is a very powerful feature. A Router could be used for basic routes, authenticated routes, and API routes.

By generating numerous instances of the Router and applying them to our apps, we can make them more modular and versatile than ever before. We’ll now look at how to process requests with middleware.

Route Paths

The endpoints at which requests can be made are defined by the route routes. ‘/’, ‘/about’, ‘/book’, and ‘/any-random.path’ is the only strings we’ve seen so far, and they’re utilized precisely as stated.

String patterns can also be used as route routes. To create patterns of endpoints that will be matched, string patterns utilize a type of regular expression syntax. The syntax is as follows (note that string-based paths interpret the hyphen (-) and the dot (.) literally):

+: The endpoint must contain one or more of the previous characters (or groups), for example, a route path of ‘/ab+cd’ will match abcd, abbcd, abbbcd, and so on.

(): ‘/ab(cd)?e’ performs a?-match on the group (cd)—it matches abe and abcde.

?: The previous character (or group) must be 0 or 1, e.g., a route path of ‘/ab?cd’ will match endpoints acd or abcd

*: The * character may be placed anywhere in the endpoint’s string. Endpoints abcd, abXcd, abSOMErandomTEXTcd, and so on will be matched by a route path of ‘/ab*cd’, for example.

Conclusion

We now have more flexibility than ever before in creating our routes thanks to the integration of the Express 4.0 Router. To summarise, we can:
  • To define groups of routes, call express.Router() multiple times.
  • Use app.use() to apply express.Router() to a portion of our site and handle requests with route middleware.
  • To validate parameters using .param, use route middleware ()
  • To define numerous requests on a route, use app.route() as a shortcut to the Router.

With all of the different methods, we can create routes, I’m confident that our applications will improve in the future. If you have any questions or recommendations, please leave them in the comments section.
Scaling and Securing WebSockets with HAProxy - Explained

Scaling and Securing WebSockets with HAProxy - Explained

Scaling and Securing WebSockets with HAProxy - Explained
In this article, I will discuss Websockets and how to Scale and Secure WebSockets with HAProxy, Coding and many more.

What is WebSockets

Whenever a client tries to establish a connection from a web server, the First thing that browser does is that it sends the connection as “Upgrade” in a Request Header. When the Web Server receives an upgrade header, It tells the server that it wants to change the connection to WebSocket instead of HTTP.

Upgrade Header is used to confirm that the client is entitled to request an upgrade to WebSocket. The Upgrade general header allows the client to specify what additional communication protocols it supports and would like to use if the server finds it appropriate to switch protocols.

What is a Reverse Proxy

A reverse proxy accepts a request from a client, forwards it to a server that can fulfil it, and returns the server’s response to the client.

Scaling WebSockets

In the below illustration, we have 2 clients and 2 backends with WebSocket running. If Client 1 makes a request to reverse proxy by sending an upgrade packet then it basically forward to one of the backend servers. All Reverse Proxy does not support WebSocket. Only a few support such as NgINX, HAProxy etc. We can assume that the load-balancing algorithm is Round Robin so it is going to connect to SERVER1.

Now We have one TCP connection between Client & WebSocket and another TCP Connection between Reverse Proxy & WebSocket Server. Since this is WebSocket Protocol, so Reverse Proxy will act as Layer 4 Proxy. It will Stream Every Single Packet that you send from Client 1 will be sent to Server 1. There is a dedicated TCP Connection to Client 1. It will act as a 1:1 TCP Connection.

Similarly, Client 2 Make a request and the request is sent to WebSocket 2. The main issue is that If Client 1 wants to send a message to Client 2 then in that case since the connection is established between Client 1 and Server 1 so Server 2 is unaware of Server 1. To make aware of Sever 2 we need to use Redis. Redis helps in Passing events between Servers.

Coding

The server only has a list of clients who are connected to a particular server. If you want to pass messages from one server to another server then you must store data in the shared database like Redis between servers using Publisher/Subscriber framework like RabbitMQ. In this, I have configured HAProxy and Pass messages to all the connected clients.

I have taken 3 Server. 1 Master and 2 Slaves.

Master: 3.144.84.135 -> For HAProxy Configuration
Slave : 18.218.115.196 , 52.14.245.146 -> Run WebSockets

STEP 1: Install HAProxy and Configure with the below instructions in Master Server

frontend haproxynode
bind *:80
default_backend backendnodes

backend backendnodes
balance roundrobin
server server1 18.218.115.196:4000 check server server2 52.14.245.146:4000 check
STEP 2: Configure Slave Server with below Instruction. Create index.html file and replace IP with HAProxy IP.

<html lang="en">
    <head>
        <title>WebSocket Server 1</title>
    </head>
    <body>
        <h1>WebSocket Example Server 1</h1>

        <form>
            <label for="message">Message:</label><br />
            <input type="text" id="message" name="message" /><br />
            <input type="button" id="sendButton" value="Send" />
        </form>

        <div id="output"></div>

        <script type="text/javascript">
            window.onload = function() {
                // connect to the server
                let socket = new WebSocket("ws://3.144.84.135/ws/echo");
                socket.onopen = () => socket.send("Client connected!");

                // send a message to the server
                var sendButton = document.getElementById("sendButton");
                var message = document.getElementById("message");
                sendButton.onclick = () => {
                    socket.send(message.value);
                }

                // print a message from the server
                socket.onmessage = (evt) => {
                    var output = document.getElementById("output");
                    output.innerHTML += `<div>${evt.data}</div>`;
                }
            }
        </script>
    </body>
</html>
STEP 3: Configure Slave Server with the below code. Create an index.js file and run the server.

const express = require('express');
const app = express();
const path = require('path');
const expressWs = require('express-ws')(app);

// Serve web page HTML
app.get('/ws', (req, res) => {
    res.sendFile(path.join(__dirname + '/index.html'));
});

// WebSocket function
app.ws('/ws/echo', (ws, req) => {
    // receive a message from a client
    ws.on('message', msg => {
        console.log(msg);

        // broadcast message to all clients
        var wss = expressWs.getWss();
        wss.clients.forEach(client => client.send("Received: " + msg));
    })
});

app.listen(4000);

Secure WebSocket Connection

  • Enable Cors.
  • Restrict payload size.
  • Authenticate users before WS connection establishes.
  • Use SSL over websocket.

To learn more: visit secure your WebSocket connections.

Hope you like our Scaling and Securing WebSockets with HAProxy Blog. Please Subscribe to our blog for an upcoming Blog.
Blogger Future - What is Google's Future Plan for Blogger

Blogger Future - What is Google's Future Plan for Blogger

Blogger Future - What is Google's Future Plan for Blogger
Blogger is a content publishing platform owned by Google like WordPress. Even though it is owned by Google, there are not as many major updates released for Blogger. Unlike other Google products, Blogger is not consistently updated by Google. 

Blogger is more flexible than WordPress, yet Blogger is not provided with many customization features unlike other Google services. And Google is not consistent to publish updates on Blogger. WordPress has clear goal on what they are going to do with it, and they always, make it clear, but Google hasn't stated future plan for Blogger.

Now, questions may arise, what could be Google's future plans for Blogger? Also, what is Google's revenue model for Blogger? Is Blogger sustainable or not? Will Google close Blogger like Google+, and if so, when? Will Google turn Blogger into subscription based model? 

In this article we will try to answer all of this question of yours.

Google's Roadmap For Blogger

Google has not released any specific road map regarding Blogger. However, they have made several announcements regarding upcoming features and enhancements for Blogger. They have stated that they are planning to add more features and options that will make it easier for bloggers to customize their blogs.

The last major update that Blogger received from Google, was on November 2016, when they redesigned the dashboard, added a couple of new themes that look similar to the free basic ones on WordPress.com. Though there were minor updates too, in 2019 Goggle released an update regarding improving user experiences mobile devices.

Though, Google does some micro updates regularly just to fix bugs and optimize performance for mobile devices.

Google's future plans for Blogger

Google has not stated anything regarding Blogger's Future. Blogger probably will stay as it is, for a decade or so. But if we think analytically Google probably will update Blogger frequently in future. As in the past they were so focusing on Google+, a social media platform like Facebook. Now that they have closed Google+, we can expect a focusing shift in Blogger.

Blogger could have been a closer competitor to WordPress. But, Blogger didn’t live up and progress enough as it should have. Analytically speaking, Google has no clear goal and strategy for Blogger. 

What is Google's revenue model for Blogger

Blogger make a percentage of ad revenue generated on their platform through Google AdSense, Also Google promotes Google domains through blogger, this is a strategy for Google to promote their domain services. 

Additionally, Blogger helps to maintain Google their entire ad eco-system. Also Blogger can be helpful for Google as it can share user data with Google, an Google can improve their ad relevancy based on that. 

Is Blogger sustainable or not

Yes blogger is sustainable for Google. Since, Google acquiring Blogger in 2003, they have not stated anything like Blogger is not sustainable for them or not, they have closed a similar platform of their like Blogger, but they probably have not intention of doing so with Blogger.

Will Google close Blogger like Google+

Like, I stated in the previous paragraph, Google probably will not close Blogger for a decade. Even in 2015s people had concerns regarding Google closing Blogger, but that has not happened even after 10 years, you can expect Google to be more engaged on blogger since, they have already closed a similar platform Google+.

Will Google turn Blogger into subscription based model

In simple words, No. Google will never turn Blogger into a subscription based revenue model. As a free platform it really offers a fair amount of features, but as a paid platform their features are too limited to compare with others like Wix, WordPress.

No one probably will continue using Blogger in that case, so if they bring a subscription based paid model they have to offer a lot of features to compete with other blog publishing platforms like WordPress, Wix, Tumblr.

Future of Blogger

We can't make any claims on Blogger's future, we can only assume, whenever anybody starts blogging there is a high chance that they start with blogger. Later some shift to WordPress and some not. Now the people who stayed with Blogger mostly rely on Google AdSense as their main source of revenue, that help's Google to maintain their entire ad eco-system. 

However, there is a possibility that Google continues updating Blogger.

What can Google do to Improve Blogger

Things that Google can do to make Blogger more useful and also to compete with WordPress and others,
  • Making third-party plugins available for Blogger.
  • Integrating custom permalink structure or categories.
  • Improving templating engine.
  • Building an official documentation.
  • Integrating Jekyll, or Hugo with Blogger.